
BakeryDiary is a recipe curation and editorial platform. We research and curate recipes from public sources, considering ratings, reviews, comments, and feedback. We then refine and present them clearly for home cooks. We are committed to an ad-free, focused experience that makes discovering and preparing recipes easier.
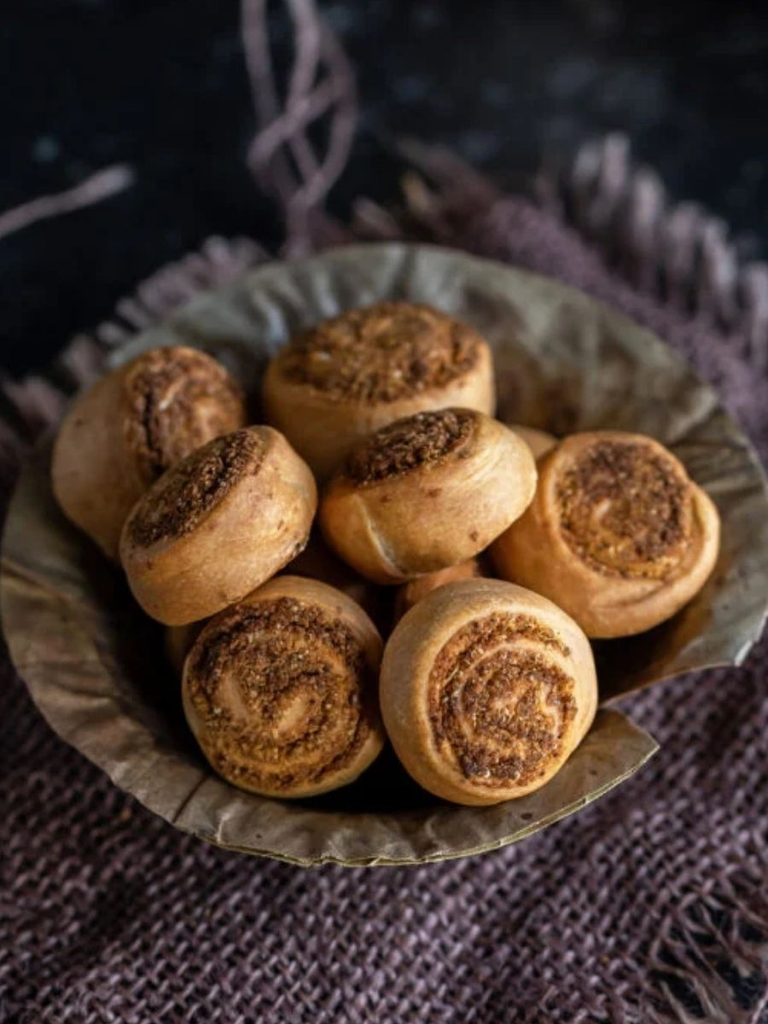
Bhakarwadi is a wonderfully crisp Indian snack that turns a simple flour dough into irresistible little spiral pinwheels.
Each piece has a delicate, crunchy outer layer wrapped around a fragrant filling of toasted coconut, sesame seeds, cumin, fennel, and poppy seeds.
The seasoning brings together Kashmiri red chili powder, coriander, garam masala, amchur, hing, salt, and sugar, creating a distinctive balance of spicy, tangy, savory, and lightly sweet flavors.
Bhakarwadi is traditionally enjoyed as a snack, particularly alongside a hot cup of chai.
The dough combines all-purpose flour and besan with oil, giving the finished pinwheels a sturdy but pleasantly crisp shell.
The filling is gently roasted before being ground, allowing the sesame, fennel, cumin, poppy seeds, and coconut to develop their aroma without making the mixture oily.
Once spread over the thinly rolled dough, the filling is pressed into place, then rolled tightly into a log and sliced into compact rounds.
The real charm comes from the texture. Properly fried bhakarwadi should be deeply crisp rather than greasy, with clearly defined layers and a flavorful, crumbly filling in every bite.
Careful rolling and sealing help keep the spirals intact during frying. For a lighter preparation, the same shaped bhakarwadi can also be cooked in an air fryer until golden and crisp.
This recipe makes about 30 pieces, making it ideal for teatime, snack platters, or keeping in an airtight container for later.


Sweet Spicy Sesame Bhakarwadi
Ingredients
Equipment
Method
- Prepare the Dough: Add the all-purpose flour, besan, and ¾ teaspoon salt to a large bowl. Mix well, then add the 2½ tablespoons oil gradually, about 1 tablespoon at a time.
- Incorporate the Oil: Rub the flour and oil together thoroughly between your palms until the oil is evenly distributed. Press some of the mixture between your palm and fingers; it should hold its shape when compressed, indicating that the oil has been incorporated properly.
- Form the Dough: Add water gradually, mixing as you go, until the flour comes together. Knead until you have a smooth, semi-soft dough; approximately ⅓ to ½ cup water may be needed, depending on the flour.
- Rest the Dough: Transfer the dough to a bowl, cover it with a damp cloth or damp paper towel, and leave it for 10 minutes.
- Knead Again: After the first 10-minute rest, knead the dough for 5 minutes. Return it to the bowl, cover again with a damp paper towel, and let it rest for approximately 20 minutes.
- Toast the Sesame Seeds: Place a pan over medium heat and add the white sesame seeds. Roast for about 3 minutes, stirring frequently.
- Toast the Remaining Seeds: Add the cumin seeds, fennel seeds, and poppy seeds. Continue roasting for about 1 minute, stirring so the seeds toast evenly.
- Toast the Coconut: Add ¾ to 1 cup desiccated coconut and roast for another 2–3 minutes, stirring often, until the coconut becomes light golden brown.
- Cool the Roasted Mixture: Remove the pan from the heat and transfer the toasted mixture to a plate. Allow it to cool completely before grinding.
- Make the Filling: Transfer the cooled mixture to a blender. Add the coriander powder, garam masala, Kashmiri red chili powder, amchur, hing, salt, and sugar.
- Grind Carefully: Blend just until the ingredients are well combined. Do not over-blend, because the coconut can release its oil and make the filling wet.
- Moisten the Filling: Transfer the ground mixture to a plate and mix in 1–2 tablespoons water as needed. The filling should be slightly moist and easy to spread and roll, but it should not become wet or loose.
- Divide the Dough: Divide the rested dough into 5 equal portions, approximately 80–90 g each. Keep the portions you are not working with covered by a damp paper towel.
- Roll One Portion: Take one dough portion and roll it between your palms to form a smooth ball. Use a rolling pin to roll it into a very thin sheet, approximately 1/32 inch thick.
- Trim the Sheet: Trim the edges to create a square or rectangle approximately 7 inches long.
- Moisten the Dough: Lightly brush the surface of the rolled dough with water using a pastry brush.
- Spread the Filling: Place the prepared filling over the dough, leaving approximately 1 inch clear around all sides. Press the filling firmly with the back of a spoon so it adheres to the moistened dough. Avoid overfilling.
- Roll the Pinwheel: Starting from one end, roll the dough tightly toward the opposite side. Keep the roll firm and even so the filling remains securely inside.
- Prepare the Sealing Paste: Mix 2 tablespoons flour with 4 tablespoons water to make a flour-water paste.
- Seal the Roll: Apply the flour-water paste to the opposite edge of the dough. Press and thin the ends slightly with your fingers as you apply the paste, then bring the edges together and seal the roll. Gently roll the sealed log between both hands to even it out.
- Cut the Log: The finished log should be approximately 6–7 inches long. Use a knife to cut it into pieces about 1 inch wide.
- Shape the Pieces: Rotate each cut piece gently with your fingers to give it a slightly rounded shape. Press down lightly from the top to secure the filling and flatten the pinwheel slightly.
- Keep Shaped Pieces Covered: Place the finished bhakarwadi under a damp cloth while preparing the remaining pieces so they do not dry out. Continue rolling, filling, sealing, and cutting until all the dough has been used.
- Heat the Frying Oil: Pour approximately 1 inch of oil into a kadai and heat it over low-medium heat. Bring the oil to approximately 140–150°C (285–300°F).
- Maintain the Correct Temperature: Keep the oil at low-medium heat throughout frying. Oil that is too hot can prevent the bhakarwadi from becoming properly crisp, while oil that is too cool can cause them to absorb excessive oil.
- Fry the Bhakarwadi: Carefully add a few pieces to the oil without overcrowding the kadai. Fry until golden brown, turning them during cooking so they color evenly.
- Cook Each Batch: Fry each batch for approximately 8–10 minutes. If the oil becomes too hot between batches, allow it to cool slightly before adding the next batch.
- Drain the Bhakarwadi: Remove the golden-brown bhakarwadi with a slotted spoon and place them on tissue or paper towels to absorb excess oil.
- Cool and Store: Allow the fried bhakarwadi to cool completely, then transfer them to an airtight container.
- Prepare for Air Frying: Shape the bhakarwadi following the same rolling and filling process, but keep each piece no larger than 1 inch and flatten them slightly more than the stovetop version.
- Preheat the Air Fryer: Preheat the air fryer according to the manufacturer's instructions.
- Arrange the Bhakarwadi: Place the prepared pieces in the air fryer and spray the tops lightly with oil spray.
- Air Fry: Cook at 340°F for approximately 17–18 minutes, shaking the basket once halfway through cooking.
- Check for Doneness: Because air fryers vary, begin checking around the 14–15-minute mark and continue as needed until the bhakarwadi are golden brown. They will become crisper as they cool.
- Cool and Store: Let the air-fried bhakarwadi cool, then store them in an airtight container.
Notes
- Keep the dough portions not being used covered with a damp cloth or damp paper towel so they do not dry out.
- The filling should be slightly moist, but not wet. Adding 1–2 tablespoons of water helps it adhere to the dough.
- Avoid over-blending the toasted coconut mixture, as releasing too much coconut oil can make the stuffing wet.
- Roll the dough very thin, approximately 1/32 inch, for the characteristic crisp, layered texture.
- Do not overfill the dough. Too much stuffing can make the roll difficult to tighten and shape.
- Rolling the dough tightly is important because loose rolls can open during frying.
- Use the flour-water paste to seal the final edge securely before cutting the log.
- Maintain the frying oil at approximately 140–150°C (285–300°F). High heat can prevent proper crisping, while low heat can make the bhakarwadi absorb too much oil.
- If using whole wheat flour, up to 50% of the all-purpose flour can be replaced with whole wheat flour.
Chef’s Secret
The most important trick for beautifully intact bhakarwadi is to focus on the moisture and tension of the roll.
The filling should be just damp enough to cling to the dough without becoming wet or pasty.
After brushing the rolled dough lightly with water, spread the filling evenly and press it down gently with the back of a spoon.
Then roll from one end as tightly as possible, keeping the log compact all the way across. Pay particular attention to sealing the final edge with the flour-water paste.
A secure seal prevents the spiral from loosening in the oil, while the correct low-medium frying temperature allows the layers to become crisp without excessive oil absorption.
Serving Suggestions
Serve Sesame Bhakarwadi at room temperature alongside a freshly brewed cup of chai for a classic teatime pairing.
They also work well on Indian snack platters with other savory bites, where their crisp texture and sweet-spicy filling provide variety.
For additional flavor, serve them with a suitable chutney as a dipping accompaniment.
Their compact size makes them convenient for gatherings, afternoon snacks, or casual entertaining.
Once completely cooled, keep any leftovers in an airtight container to preserve their crunch.
Conclusion
These Sesame Bhakarwadi deliver a satisfying combination of crisp pastry, aromatic spices, toasted coconut, and nutty seeds in every spiral.
The careful rolling, sealing, and controlled frying are the keys to achieving well-formed, crunchy pinwheels with flavorful filling throughout.
With about 30 pieces from one batch and an air-fryer option available, this versatile Indian snack is a delicious choice for teatime, snack platters, or making ahead for later enjoyment.
