
BakeryDiary is a recipe curation and editorial platform. We research and curate recipes from public sources, considering ratings, reviews, comments, and feedback. We then refine and present them clearly for home cooks. We are committed to an ad-free, focused experience that makes discovering and preparing recipes easier.

Red Velvet Cake is a beautifully balanced layer cake known for its striking red color, soft crumb, and delicate combination of buttery, chocolatey, vanilla, and tangy flavors.
This classic version brings together cake flour, a small amount of unsweetened cocoa powder, butter, vegetable oil, buttermilk, and red food coloring to create its signature character.
The cake flour helps give the sponge a particularly tender texture, while the combination of butter and oil keeps the crumb moist and rich without making it heavy.
Buttermilk contributes a gentle tang and works with the baking soda to support the cake’s texture.
The flavor is subtle rather than intensely chocolatey, with vanilla and cocoa providing depth while the buttermilk adds a pleasant tang.
Once baked, the two soft red layers are cooled and finished with a smooth cream cheese frosting made from Philadelphia cream cheese, butter, vanilla, and sifted powdered sugar.
The creamy frosting provides a rich, lightly sweet contrast to the tender cake.
With its vivid appearance and elegant layers, this Red Velvet Cake is especially appealing for celebrations, afternoon desserts, or any occasion where a classic centerpiece is wanted.
The finished cake can be decorated simply with frosting or topped with crumbs from the trimmed cake edges for an attractive traditional finish.
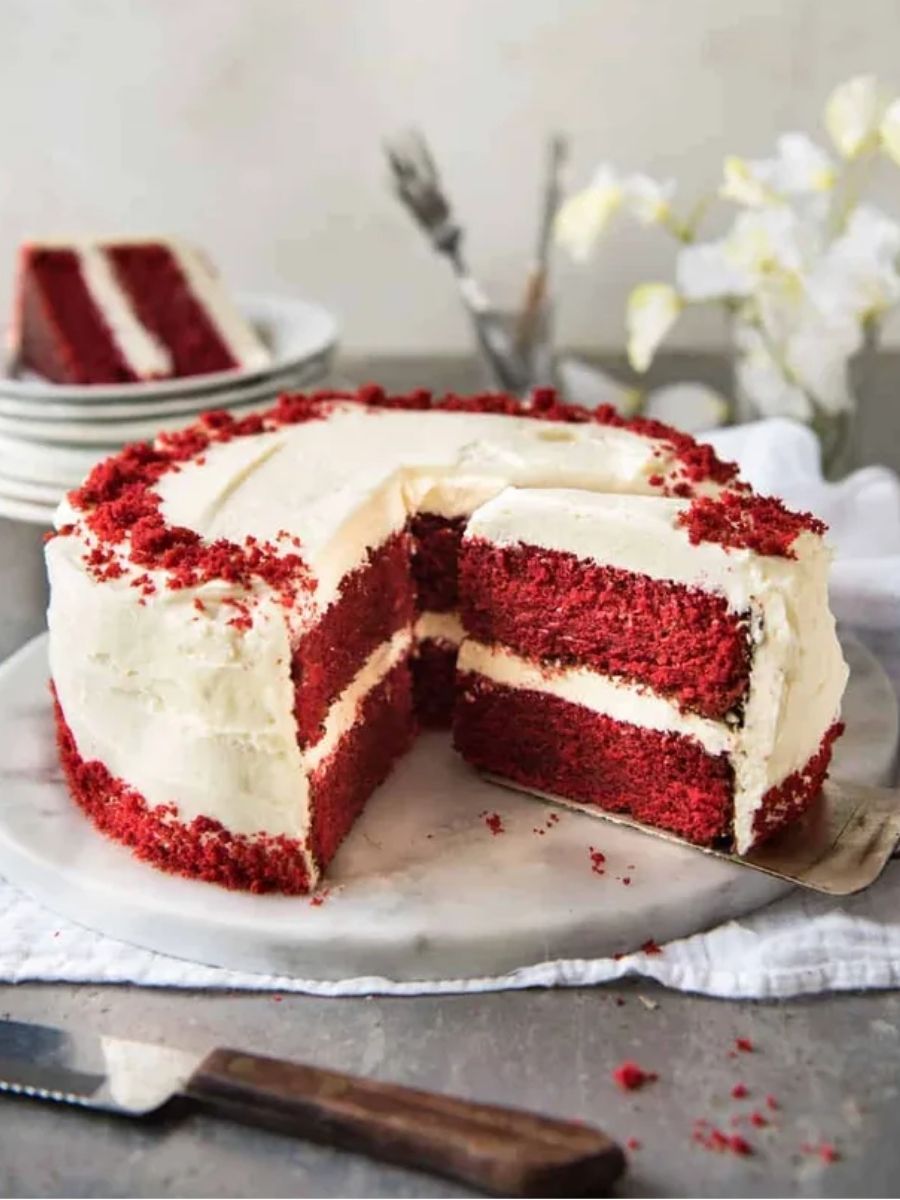

Soft & Velvety Red Velvet Layer Cake
Ingredients
Equipment
Method
- Prepare the Cake Pans: Preheat the oven to 180°C/350°F using any oven type. Butter two 21 cm / 8-inch round cake pans, coating both the bases and sides, then dust them with cocoa powder.
- Combine Dry Ingredients: Sift the cake flour, unsweetened cocoa powder, baking soda, and salt into a bowl. Whisk the sifted ingredients together until evenly combined.
- Cream Butter and Sugar: Place the softened butter and caster sugar in a mixing bowl. Beat with an electric beater, or use a stand mixer fitted with the paddle attachment, until the mixture is smooth and well combined.
- Add the Eggs: Add the eggs one at a time, beating between additions. The mixture may initially look curdled; continue beating until it becomes smooth before proceeding.
- Blend the Wet Ingredients: Add the vegetable oil, white vinegar, vanilla, buttermilk, and red food coloring to the butter mixture. Beat until the mixture is smooth and thoroughly combined. A slight separation caused by the oil is not a concern; it will come together when the dry ingredients are incorporated.
- Incorporate the Dry Mixture: Add the sifted dry ingredients to the wet mixture. Beat only until the ingredients are just combined. A few small lumps are acceptable and are preferable to overmixing the batter.
- Fill the Pans: Divide the batter evenly between the two prepared cake pans, spreading it between the pans as evenly as possible.
- Bake the Cake: Place both pans on the same oven shelf and bake for 25–30 minutes, or until a toothpick inserted into the center of the cakes comes out clean.
- Cool the Layers: Leave the baked cakes in their pans for 10 minutes. Then turn them out onto a cooling rack and allow them to cool completely.
- Whip the Cream Cheese Mixture: Beat the softened cream cheese, softened butter, and vanilla together for 3 minutes. The mixture should become very smooth and change from yellow to an almost white color.
- Add the Powdered Sugar: Add the sifted icing sugar and beat for 2 minutes, or until the frosting reaches a light and fluffy consistency to your preference. If the frosting is too runny, add more icing sugar. For best results, the butter and cream cheese should be softened enough to whip smoothly but not extremely soft.
- Trim the Cake Layers: Once the cake layers have cooled, use a serrated knife to carefully cut off the tops, creating neat, even layers.
- Fill the Cake: Place one cake layer on your serving surface. Spread 1 1/2 cups of frosting evenly over the top.
- Stack the Layers: Place the second cake layer on top of the frosted first layer.
- Frost the Cake: Spread the remaining cream cheese frosting over the top and sides of the assembled cake, covering it evenly.
- Decorate with Cake Crumbs: If desired, crumble the trimmed cake offcuts and use the crumbs to decorate the top rim and base of the finished cake.
Notes
- Cake flour: Cake flour gives the cake a particularly tender, soft crumb. If unavailable, the source provides a substitution using 2 2/3 cups / 400 g plain flour, removing 5 tbsp / 60 g and replacing it with 5 tbsp / 60 g cornstarch.
- Baking soda: Use baking soda rather than baking powder. The buttermilk provides the acidity needed to activate it.
- Sugar: Caster sugar blends into the batter more easily, although regular white sugar can also be used.
- Buttermilk: The source specifically recommends using buttermilk for this recipe rather than substituting milk and lemon juice.
- Food coloring: For the intense red color, UK bakers should use gel coloring rather than the less-intense liquid coloring commonly sold there.
- Avoid overmixing: Once the dry ingredients are added, mix only until combined. A few small lumps are preferable to developing an overly mixed batter.
- Prevent an oily base: Beat the batter well after each ingredient is added. This helps prevent oil from separating and collecting at the bottom of the baked cake.
- Frosting consistency: The cream cheese and butter should be softened enough to whip smoothly but should not be extremely soft. If the frosting becomes too runny, refrigerate it for 15–30 minutes, then beat again, or add more icing sugar.
- One-pan option: The cake can be baked in one pan, although two pans are easier. A single cake may require around 45 minutes to 1 hour of baking, with foil placed over the top at around 30 minutes to prevent excessive browning.
- Cupcake option: The recipe makes approximately 22 standard cupcakes. Divide the batter among paper-lined muffin tins and bake for 25 minutes, or until a skewer comes out clean.
- Measurement consistency: Choose either the weight/ml measurements or the cup measurements for the entire recipe. Do not switch between the two systems because cup sizes vary between countries.
Chef’s Secret
The most useful trick for this Red Velvet Cake is to pay close attention to the batter after the wet ingredients are incorporated.
Because the recipe contains both butter and a substantial amount of vegetable oil, the mixture can look slightly separated at this stage.
Rather than worrying or adding anything extra, beat the mixture well after each addition and continue as directed.
When the dry ingredients are incorporated, everything should come together.
Once the flour mixture is added, however, switch gears and avoid excessive mixing.
Stop as soon as the batter is combined, even if a few small lumps remain.
This balance—thorough mixing before the flour goes in, followed by gentle mixing afterward—helps preserve the cake’s intended soft, tender texture.
Serving Suggestions
Serve this Red Velvet Cake as a complete layered dessert with its smooth cream cheese frosting spread generously over the top and sides.
For a traditional decorative finish, crumble the trimmed cake pieces and scatter them around the top rim and base.
The creamy, tangy frosting pairs naturally with the cake’s subtle cocoa, vanilla, and buttermilk flavors.
For a simple presentation, keep the frosting smooth and cleanly finished, or use the cake crumbs for added texture and visual contrast.
Slice the chilled or fully cooled cake into neat wedges and serve on its own as a classic dessert or alongside coffee or tea.
Conclusion
This classic Red Velvet Cake delivers everything that makes the dessert so appealing: vivid red layers, a soft and velvety crumb, subtle cocoa and vanilla flavor, gentle buttermilk tang, and rich cream cheese frosting.
With careful mixing and straightforward preparation, it makes an impressive centerpiece for celebrations or an indulgent homemade treat.
