
BakeryDiary is a recipe curation and editorial platform. We research and curate recipes from public sources, considering ratings, reviews, comments, and feedback. We then refine and present them clearly for home cooks. We are committed to an ad-free, focused experience that makes discovering and preparing recipes easier.
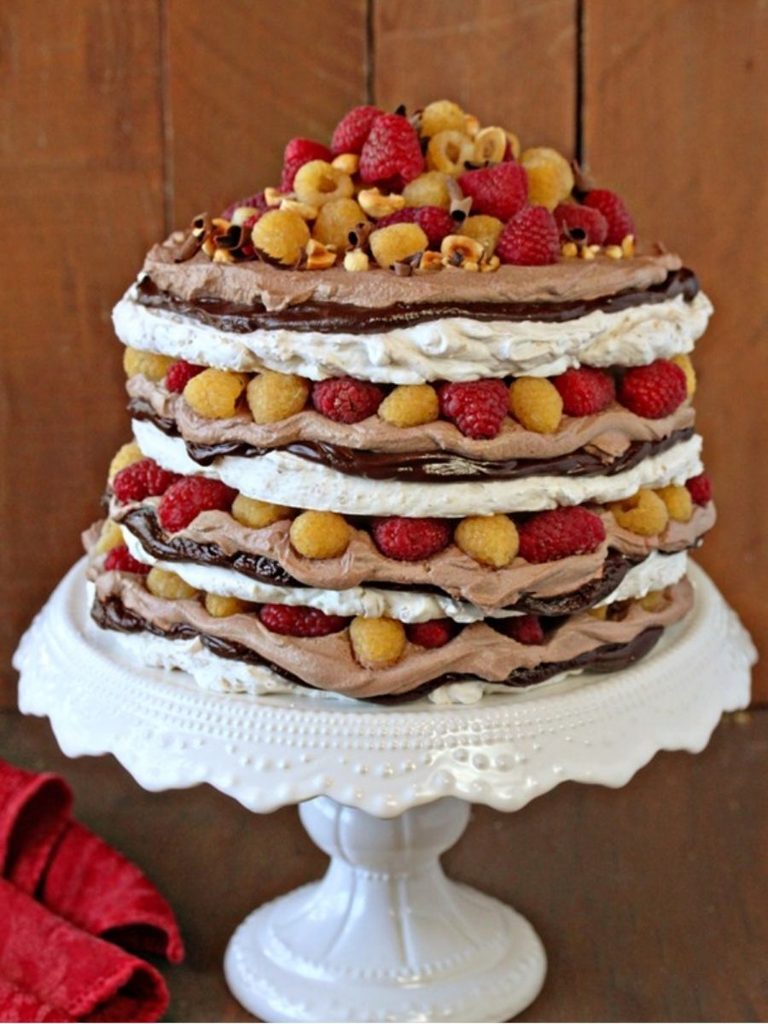
This Hazelnut Meringue Cake is a spectacular dessert built from four delicate layers of hazelnut-studded meringue, silky chocolate ganache, fluffy chocolate whipped cream, and plenty of fresh raspberries.
Each component brings something distinct to the finished cake, creating a dessert that feels both elegant and wonderfully indulgent.
The meringue layers are made from whipped egg whites, granulated sugar, cream of tartar, toasted hazelnuts, and powdered sugar, then baked slowly until they become crisp and beautifully light.
The toasted hazelnuts add a rich, nutty character throughout the meringue, while the chocolate ganache provides a smooth, deeply chocolatey contrast.
A layer of cocoa-infused whipped cream keeps the cake soft and creamy between the crisp meringue discs.
Fresh raspberries add bright fruitiness and a natural tart edge that balances the sweetness of the meringue and chocolate.
Visually, the finished cake is especially impressive: four pale hazelnut meringue layers are stacked with dark chocolate filling and cream, then crowned generously with berries, toasted hazelnuts, and chocolate shavings.
The texture changes as the cake rests after assembly. Freshly assembled, the meringue remains quite crunchy and can crack when sliced; after an hour or two, it softens slightly while retaining some of its characteristic crispness.
Although it takes some patience because of the long, slow meringue baking time, the result is a showstopping dessert that is well suited to special occasions, celebrations, or any gathering where you want an unforgettable centerpiece.


Hazelnut Meringue Chocolate Berry Cake
Ingredients
Equipment
Method
- Prepare the Meringue Templates: Preheat the oven to 200°F. Line two baking sheets with parchment paper, then trace two 8-inch circles onto each sheet, creating four circles in total.
- Heat the Egg Whites: Combine the room-temperature egg whites and granulated sugar in the bowl of a large stand mixer and whisk them together. Add about 1 inch of water to a small saucepan and bring it to a simmer. Choose a saucepan that allows the base of the mixer bowl to sit snugly over the top without touching the water.
- Warm the Meringue Mixture: Set the mixing bowl over the simmering water, ensuring its bottom does not come into contact with the water. Whisk the egg white mixture frequently as it warms to prevent the whites from cooking. Continue heating until the mixture feels hot to the touch and rubbing a little between your fingers reveals no graininess from the sugar.
- Whip the Egg Whites: Transfer the warmed bowl to the stand mixer and attach the whisk. Beat the egg whites on medium speed until foamy, then add the cream of tartar. Increase to medium-high speed and continue whipping until the meringue is glossy, stiff, and voluminous. The outside of the bowl should no longer feel hot; this can take 10 minutes or more depending on the mixer.
- Grind the Hazelnuts: While the meringue is whipping, place the toasted hazelnuts in a food processor. Pulse for a few seconds until coarsely chopped. Add the powdered sugar and process again until the nuts are finely ground. Stop before the mixture begins clumping or becoming greasy.
- Fold in the Hazelnuts: Once the meringue reaches the desired stiff, glossy consistency, gently fold the finely ground hazelnut mixture into the whipped egg whites, taking care not to unnecessarily deflate the meringue.
- Shape the Meringue Layers: Divide the hazelnut meringue evenly among the four traced 8-inch circles. Spread each portion into an even round layer.
- Bake the Meringue: Bake the four meringue discs at 200°F for 2 1/2 hours, rotating the baking sheets halfway through the baking time to promote even baking.
- Cool the Meringue: After 2 1/2 hours, turn off the oven and leave the meringue layers inside until they are completely cool. The baked meringues can be prepared up to a day ahead and kept in the cool oven until assembly.
- Prepare the Ganache: Place the finely chopped semi-sweet chocolate in a medium bowl. Pour the heavy cream into a small saucepan and warm it over medium heat until it reaches a simmer, with bubbles appearing around the sides. Do not allow the cream to boil.
- Combine the Ganache: Pour the hot cream over the chopped chocolate and let it stand for 1 minute. Whisk until the chocolate and cream form a smooth, glossy mixture.
- Thicken the Ganache: Press cling wrap directly onto the surface of the ganache and allow it to cool at room temperature until it reaches a peanut-butter-like, spreadable consistency. For faster cooling, refrigerate it for 30–45 minutes. If it becomes too firm, microwave it briefly in short intervals until it becomes spreadable again.
- Whip the Chocolate Cream: Combine the heavy cream, unsweetened cocoa powder, and powdered sugar in the bowl of a stand mixer fitted with a whisk. Beat until the mixture reaches medium peaks.
- Build the First Layer: Place one meringue disc on the serving plate. Spread one-quarter of the ganache evenly over the disc, extending it to the edge. Add one-quarter of the chocolate whipped cream and spread it evenly.
- Add the Berries: Arrange a ring of raspberries around the outer edge of the cake layer, then scatter a handful of additional raspberries across the center.
- Continue Layering: Place a second meringue disc on top and repeat the ganache, chocolate whipped cream, and raspberry layers. Continue in the same manner until all four meringue discs have been stacked.
- Decorate the Cake: Finish the top layer with the remaining ganache and chocolate whipped cream, then pile fresh berries generously in the center. Garnish with a pinch of toasted hazelnuts, chocolate shavings, or other desired decorations.
- Rest Before Serving: The freshly assembled cake can be served immediately, but the meringue layers will be quite crunchy and may crack or crumble when cut. For an easier slice and a slightly softer texture, let the assembled cake rest for 1–2 hours. The exterior will retain some crunch while the meringue becomes softer and easier to cut.
- Slice the Cake: If serving immediately, use a very sharp serrated knife and gently saw through the layers with light pressure, or cut through the individual meringue layers using kitchen shears. Expect the layers to crack or crumble somewhat; the cake is best enjoyed for its combination of textures and flavors rather than perfectly neat slices.
Notes
- The meringue requires a long, slow bake, so the cake is convenient to prepare over two days.
- On the first day, prepare and bake the meringue layers and make the chocolate ganache. Assemble the cake the following day.
- The meringue layers can be prepared a day ahead and stored in the completely cool oven until needed.
- For the best texture, enjoy the assembled cake on the day it is made.
- The meringue becomes softer after assembly. Allowing the cake to rest for 1–2 hours gives the layers a softer interior while retaining some exterior crunch.
- Freshly assembled meringue can be difficult to cut and may crack or crumble. A sharp serrated knife or kitchen shears makes serving easier.
- A kitchen scale is recommended for the most accurate baking measurements, although cup measurements are provided.
- When processing the hazelnuts, stop as soon as they are finely ground. Continuing too long can cause the nuts to clump and become greasy.
- The raspberries can be replaced with other berries or sliced fruit as specified in the original recipe.
Chef’s Secret
The most important detail for beautifully textured hazelnut meringue layers is stopping the food processor at the right moment.
Process the toasted hazelnuts until they become finely ground, but watch closely as they transform from crumbs into a paste surprisingly quickly.
As soon as the nuts are fine enough to fold into the meringue, stop processing. If they begin clumping or looking greasy, the natural oils are being released, which can affect the intended texture of the finished layers.
It is also important to make sure the sugar has dissolved completely when warming the egg whites: rubbing a small amount between your fingers should reveal no graininess.
These two small checks help preserve the delicate structure of the meringue.
Serving Suggestions
Serve the cake as a dramatic centerpiece, keeping the fresh raspberry topping generous so the bright fruit balances the rich chocolate and sweet hazelnut meringue.
Toasted hazelnuts and chocolate shavings make simple, complementary finishing touches.
For the best texture, allow the assembled cake to stand for 1–2 hours before slicing so the meringue softens slightly.
Because the layers may crack or crumble, serve individual slices on dessert plates and embrace the rustic appearance.
Additional fresh berries can be placed alongside each portion for a fresh fruit accent.
Conclusion
Hazelnut Meringue Cake brings together crisp, nutty meringue, smooth chocolate ganache, airy chocolate whipped cream, and vibrant fresh berries in one impressive layered dessert.
Although the meringue requires patience and the finished cake can be a little messy to slice, its contrasting textures and rich chocolate-hazelnut flavor make the effort worthwhile.
Preparing the meringues and ganache ahead of time makes assembly easier, leaving you with a beautiful dessert ready for a special occasion or memorable gathering.
